Cloud TnA WEB Manual
1.1.Introduction
First of all, we would like to thank you for choosing our application. Time and Attendance application can be applied instantly and effects of it's operation can be visible and measurable in a very short notice. We are hoping that this instruction manual will help you install TnA application easily in order to familiarize with it's basic and advance options. One of those options is automatic detection of shifts, a feature that is not very common among similar applications, but is quite useful.
To start using the TnA application it is necessary to sign in at : http://time-n-attendance.
After filling in a simple registration form, you are following the link that is being sent to your e-mail address that you signed up with while completing the registration.
1.2.Log in
Launching TnA online application opens a panel which allows the user to login. User is obliged to correctly fill in the required information and then after clicking the "Login" button to access TnA application.
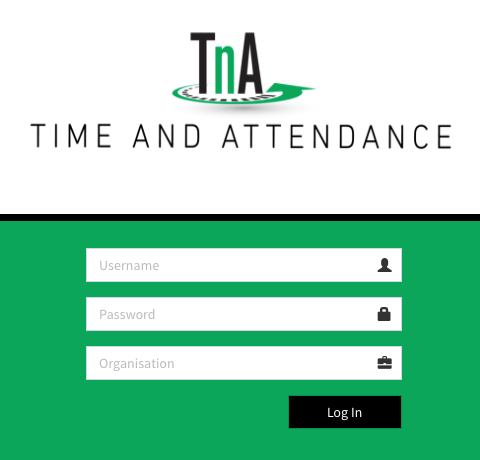
Image 1: Log in
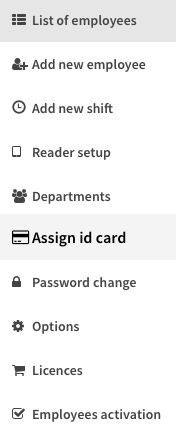
1.3.Navigation
After a successful login you will see first page of web application. The main navigation is done using the horizontal menu at the top of the page. Menu contains following options.

Image 2: Navigation
Choosing one of the options opens a vertical submenu that enables further navigation and selecting options.
2.1.Administration
This menu allows creating and editing user's data and setting up options for devices that are being added to the TnA system.
- Adding new users and data entry
- Creation of new shifts and associated settings
- Setting devices used for input events
- Review of existing and creation of new organizational units
- Assign card ID to employee
- Password change
- Assign additional reports to workers
- Buying premium license
- Selection and allocation licenses to workers
2.2.List of employees
This option enables viewing all users entered into the system as well as their basic data.
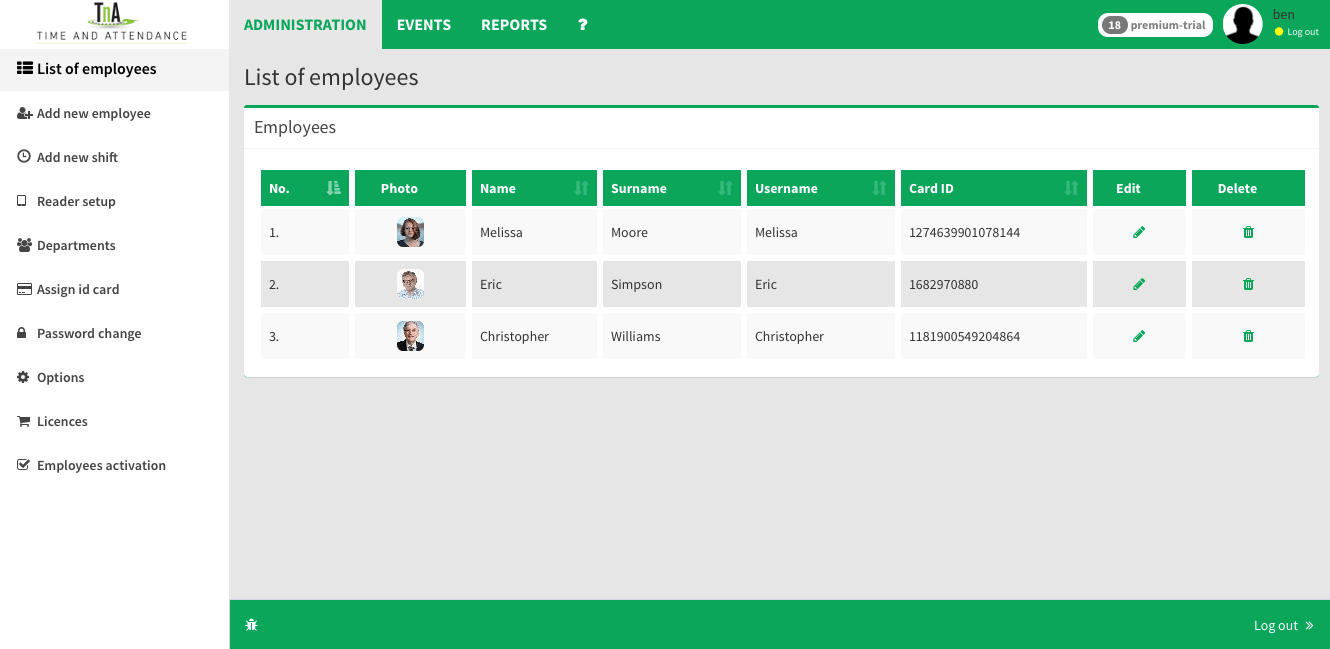
Image 3: List of employees
![]()
Edit Clicking button "Edit" opens the window that allows easy addition of data about individual users.
![]() DeleteOption for deleting users from database. In order to avoid accidental or unwanted deletion, user must follow additional confirmation procedure.
DeleteOption for deleting users from database. In order to avoid accidental or unwanted deletion, user must follow additional confirmation procedure.
2.3.Adding new users
With this option user is able to enter data of new employees whose working hours are being recorded into the database. This menu also has an option adding images of users besides, their personal details (name, registration number, etc.) as well as an option of setting shifts.
To make sure that the entered data from the form are saved into the database, user must verify it by clicking on the button "submit".
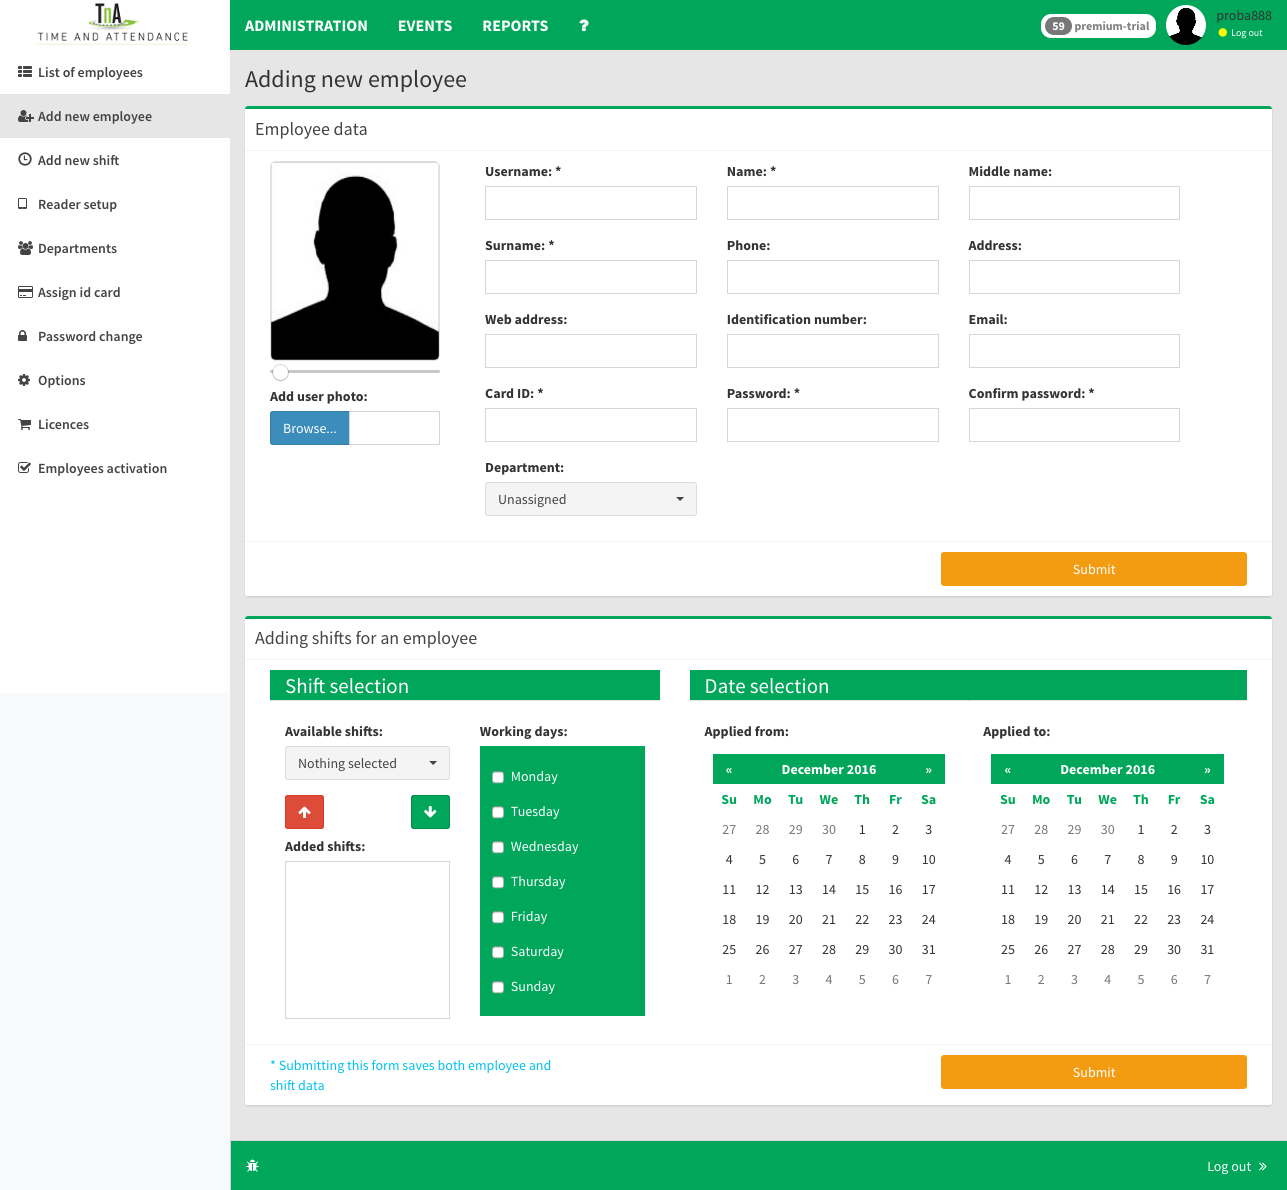
Image 4: Add new user
The table at the bottom of the window is used to adjust shifts assigned to the worker and also parameters such as the initial and the final date of application of shifts and days of the week for which the given rule applies. In case you forgot to define shifts in which new user is working, it can be always done within the option list of employees plus Edit. In order to successful enter data recorded into the database it is required to confirm changes by clicking on the button "Submit".
2.4.Add new shift
This option is for creating and configuring new shifts. User may define the term as well as the duration of the shift (start and end of shifts). Under this option it is possible to pass parameters related to the use of breaks during shifts.
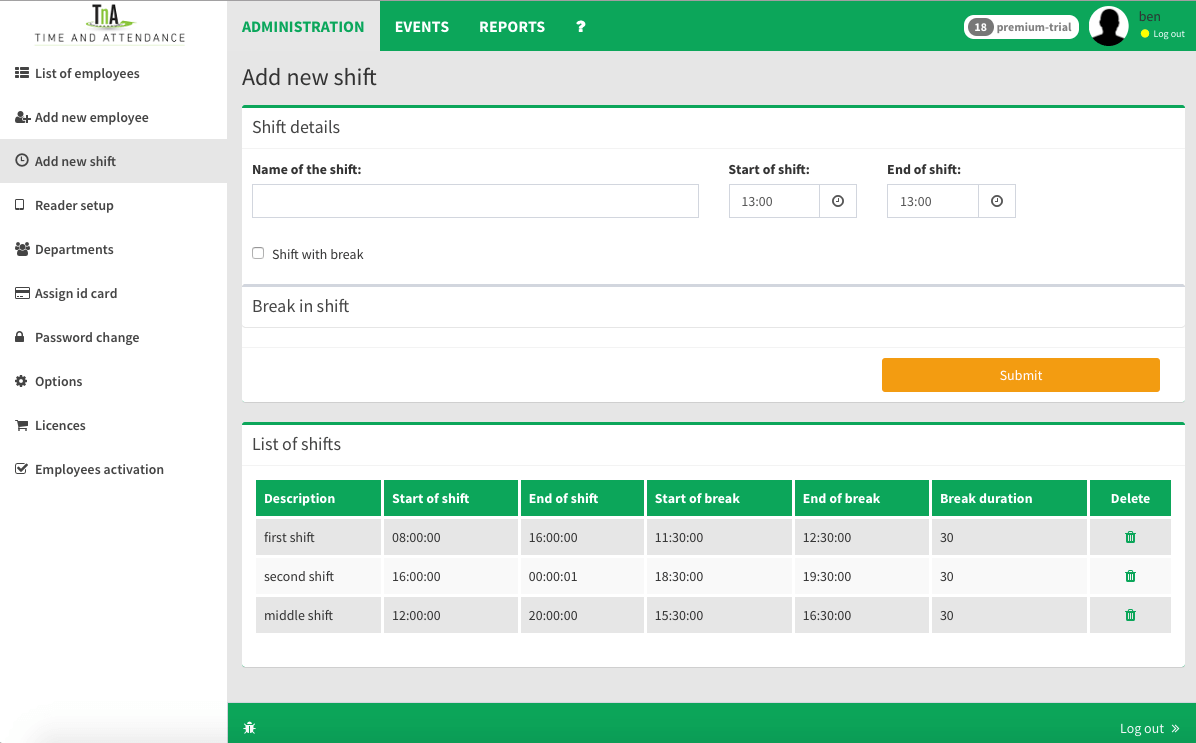
Image 5: Add new shift
- The submenu options "Start of break" and "End of break" are defining the period during which a worker can use a break.
- "Duration of break" is break period and every absence which exceeds the length of the pause time is recorded as unpaid leave.
2.5.Reader settings
This option is for adding and adjusting devices that are used in your system.During the setting, each reader is assigned with a unique ID number. That ID number is later used for reader's identification when recordings of Arrival / Departure events are being sent.
While inputing data of new device, it is very important to make a correct choice of the type of reader-Option "Reader Type". This will ensure that time of arrival or departure event is properly logged and recorded.
The basic version, which has a fully automated process of adding Android devices and additional settings in this section, may be necessary for systems with multiple devices for recording events. In the lower part there is a table with a list of currently active readers and their settings.
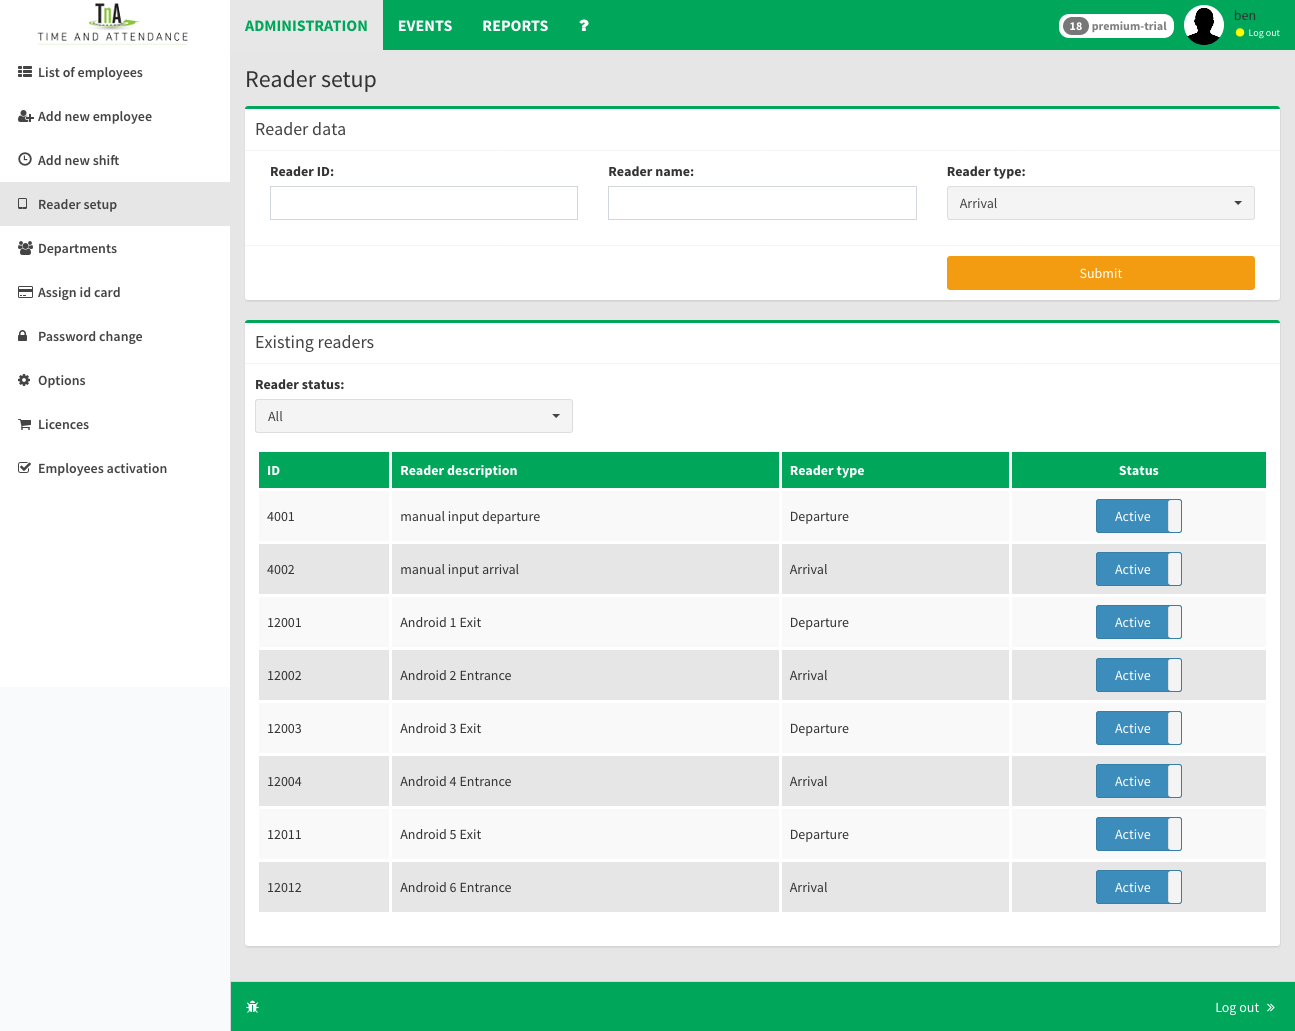
Image 6: Reader setup
2.6.Department
The option for creating new one and reviewing the entered departments. After entering the name of the new department, it's input must be confirmed by clicking on the "Submit".
A window on the right side is a reserved for the list of existing departments and the number of employees. The lower part of this page shows the structure of each department and options for adding and subtracting workers from the selected department. To add an employee to a particular department, first you must choose employee and department to which you want to attach employee, click "Add" and then confirm your selection in the appearing info panel. A process for the separation of the worker from the department is the same except that is performed by selecting the option Remove.
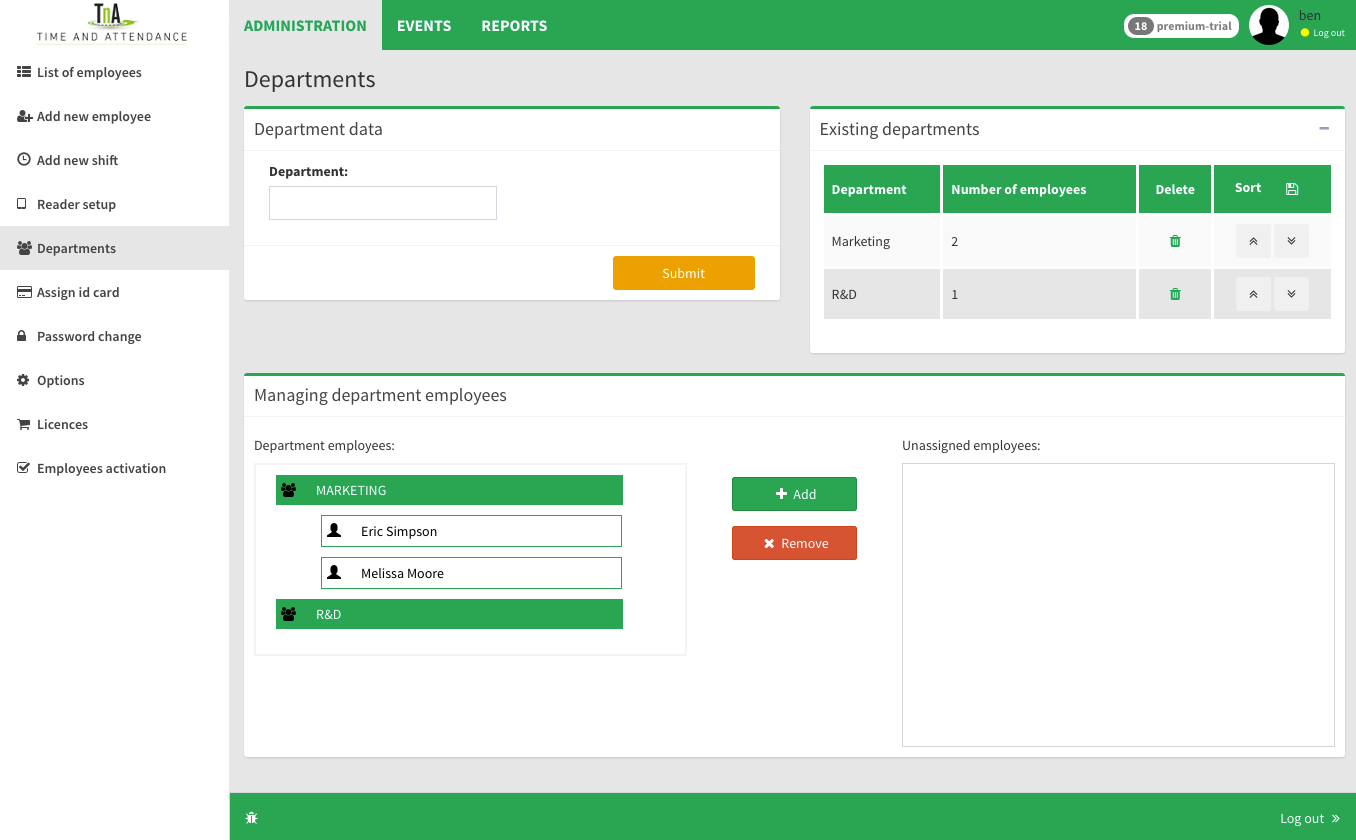
Image 7: Department
2.7.Assign card ID
With this option each new ID card registered into system can be assigned to an employee easily. Selecting "add employee" in the setup, will open the page with fill in form for new employee.
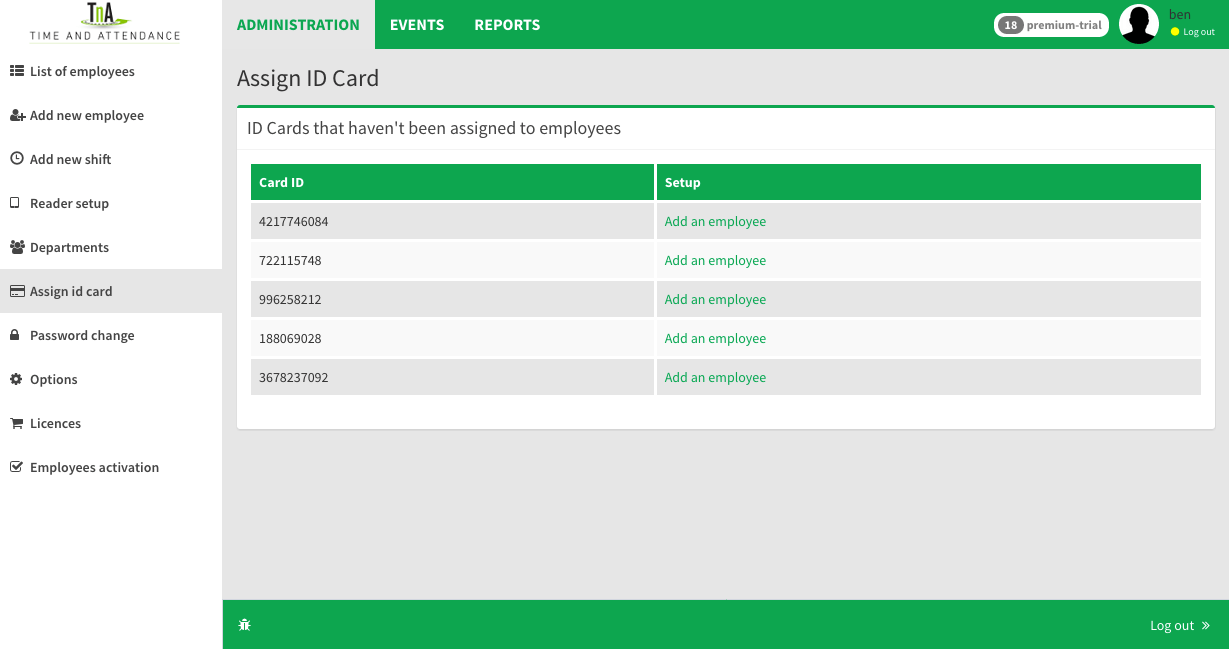
Image 8: Assign card ID
2.8.Password change
If it is required, changing password is quite easy. Fill in boxes as required: old password, new password and confirm new password. Press Submit button to confirm.
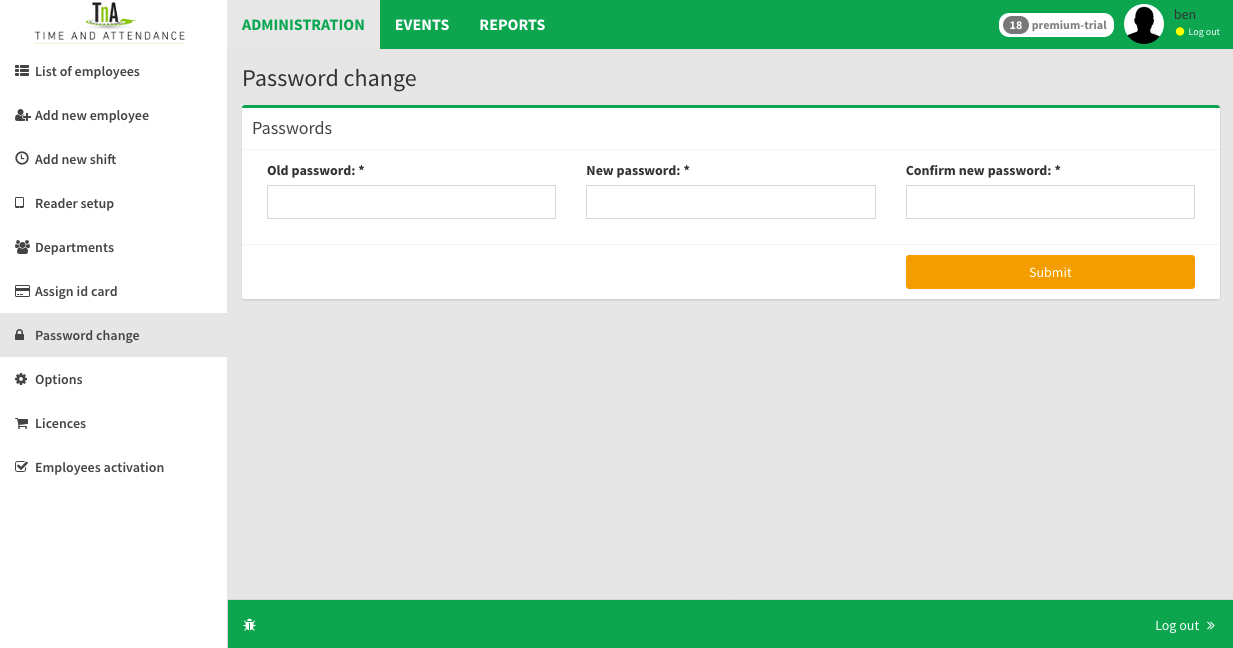
Image 9: Password change
2.9. Options
In this section, administrator have ability to delegate additional reports to employee that are not in default selected. Also these privileges can be call off if it is necessary. The possibility exists that you later create reports according to the customer request, and they will later be activated to those employees who need them.
Here is the option to change the language of the application and in case there is a large number of workers, and that the speed of displaying the list of workers slows down it is possible to reduce the display of images employees.
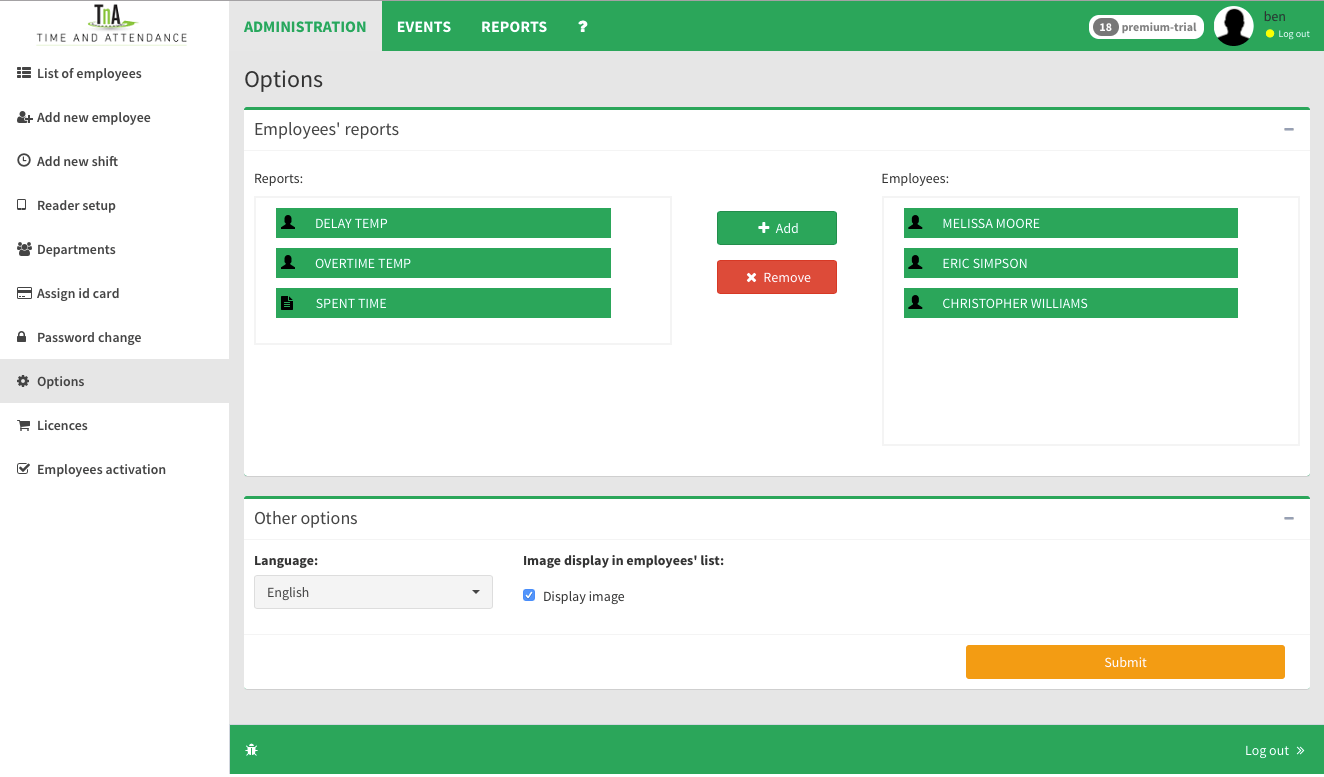 Image 10: Options
2.10.Licences
List of licenses that are linking to a specific company can be viewed on this page. Tabil shows all licenses that were active, with the number employees and the period in which they were valid, as well as the currently active licenses and licenses that are purchased for the upcoming period. In the lower part is a form for purchase of new licenses and the extension of existing ones.
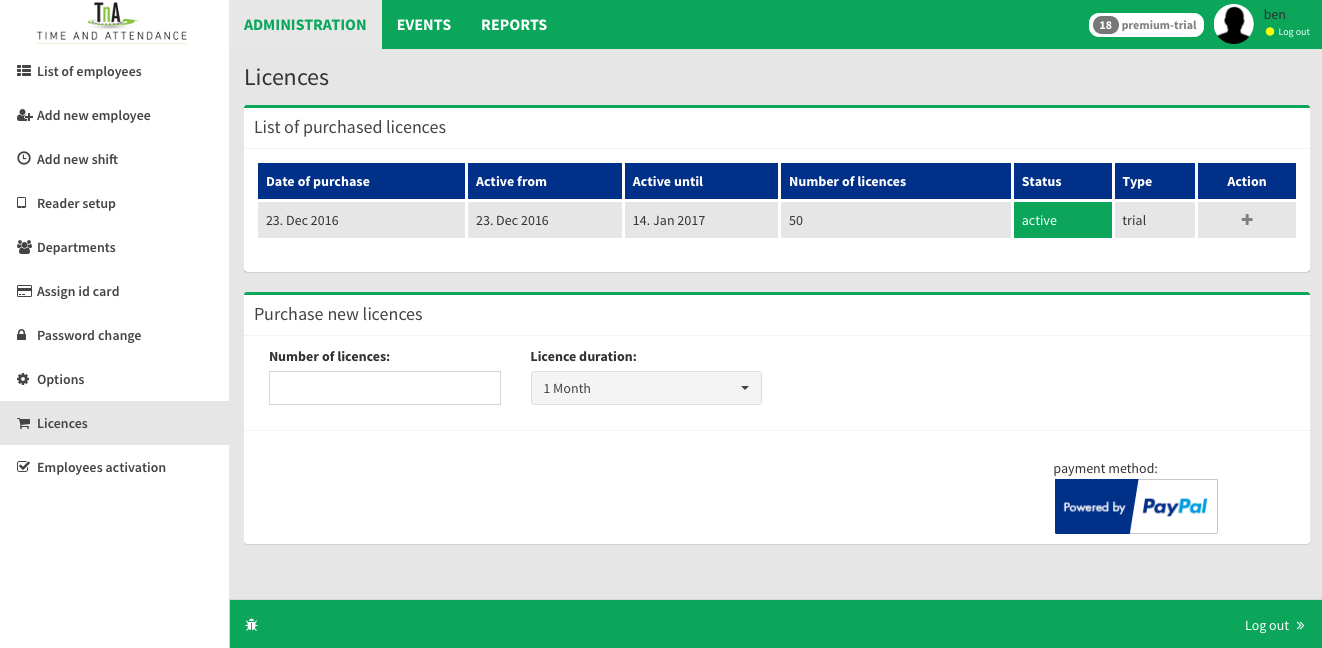 Image 11: Licences
2.11. Employees activation
From this list of workers it is possible to make a choice for which workers will be activated Premium options.
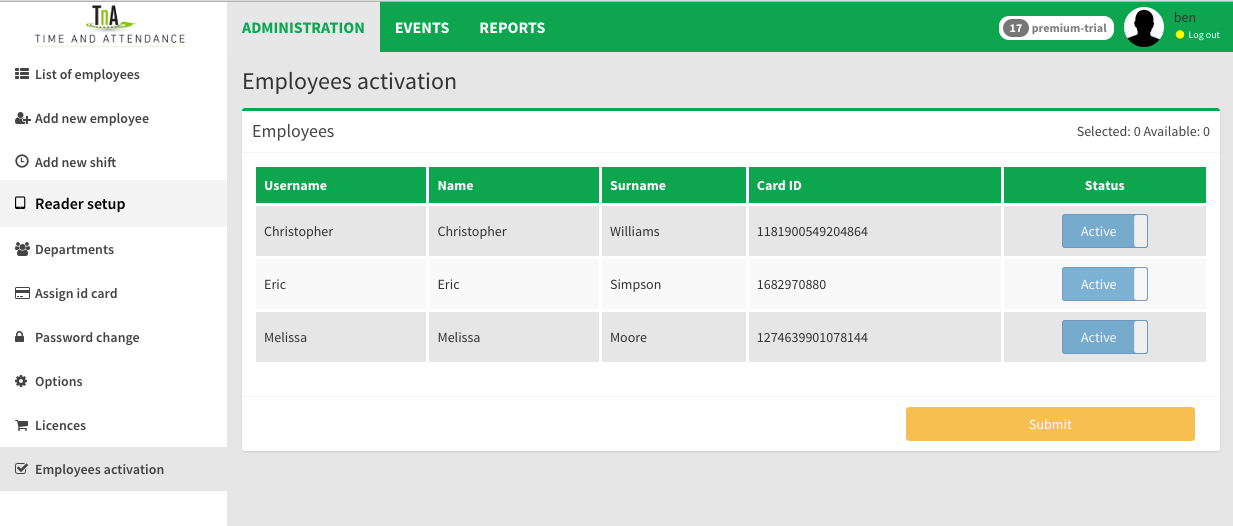 Image 12: Employees activation
3.1.Events
Menu, which consists of two sub-options:
3.2.Manual entry 3.3.Days off 3.4. Suspended events
3.2.Manual entry
By using this option it is possible to manually input events into the database. This option is mostly used by authorized personnel (security officer, doorman,etc. ), when it is necessary to enter data on an employee who haven't brought any form of identification registered to the system (such as ID card, key fob, tag). It is also useful when it's necessary to make a correction of the entered time and event data. To confirm correction of events, simply press submit button.
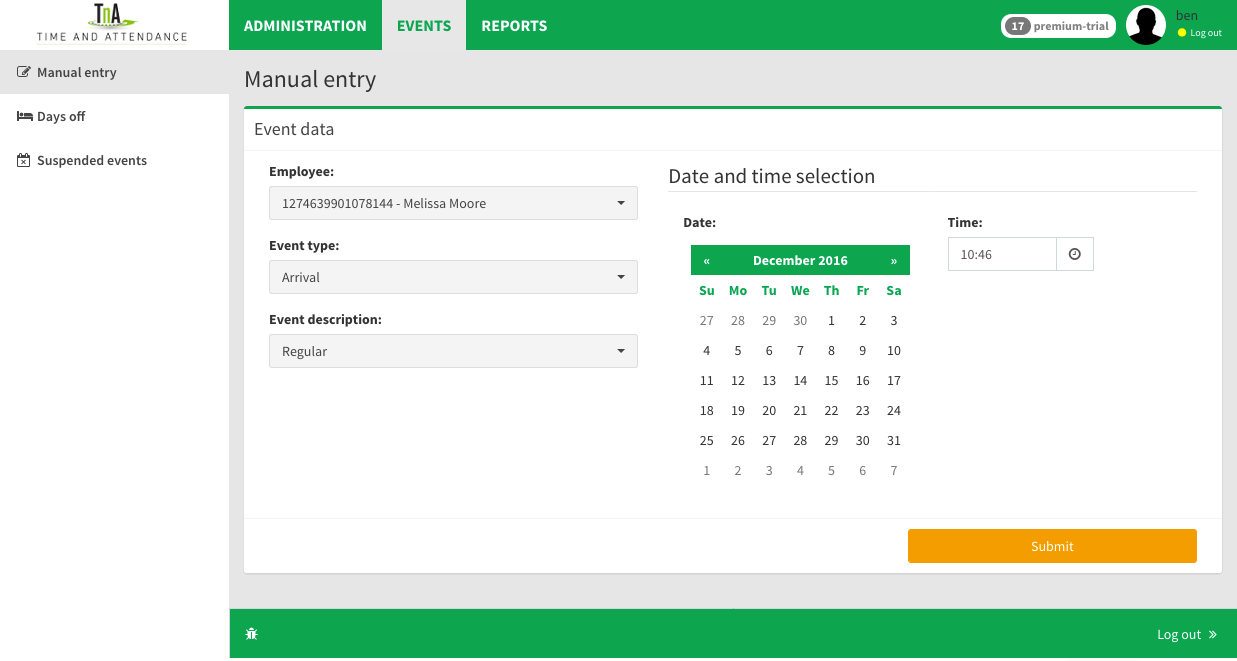 Image 13: Manual entry
3.3. Days off
This option allows defining absence from work through the following events: vacation, sick leave, holidays, paid leave-as well as the number of hours that will be tied to a specific event. Operating hours are entered along with the type of event, in order to emphasize that if an employee is working part-time (for example four hours instead of eight) his paid leave will be calculated in according to that. There are options in the menu allowing to choose holidays and days off for an entire department and confirming choice by clicking "submit".
At the bottom of the window, there is a list of employees' days off. If it's necessary data in this list can be alternated. For example, if there is an event entered by mistake, that event can be erased and correct one entered, confirming the process by clicking "submit".
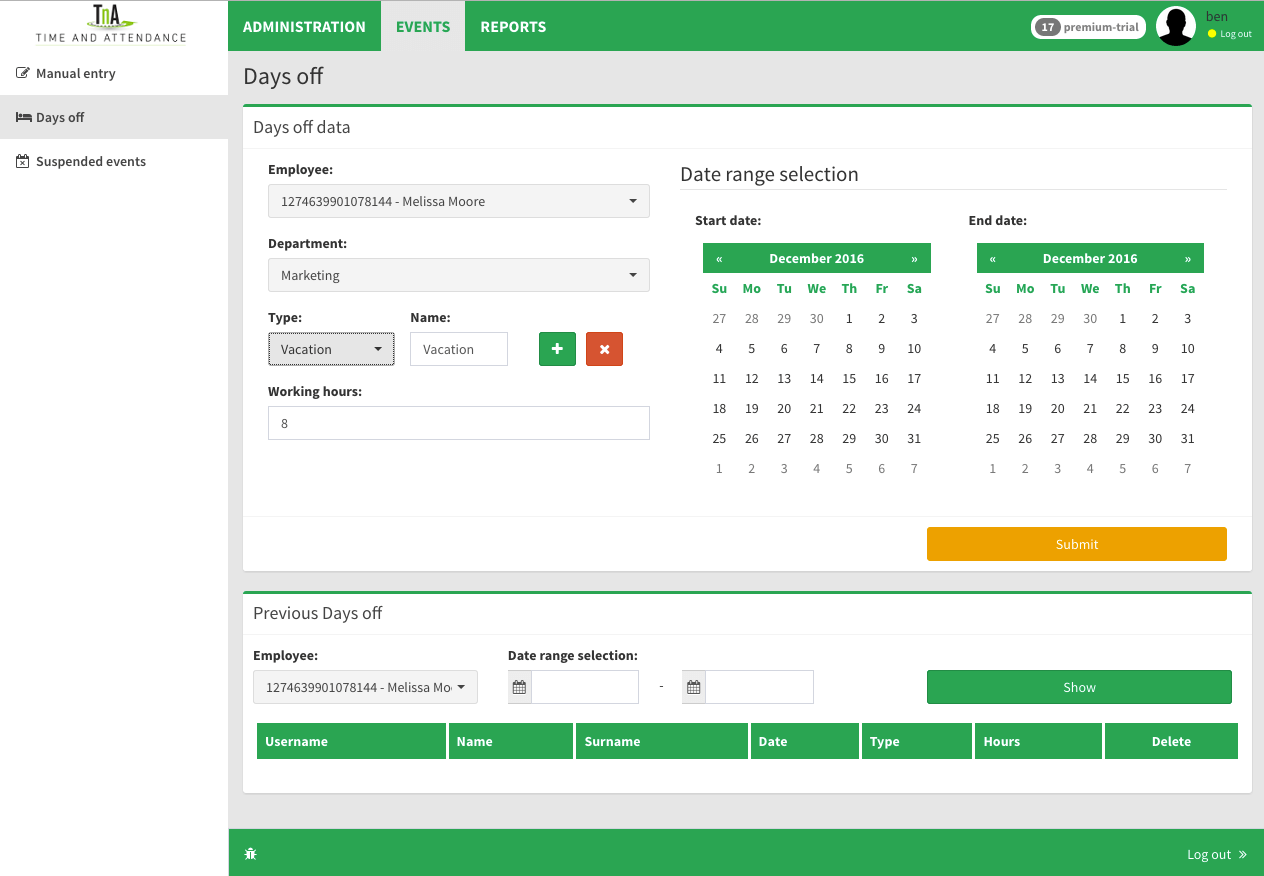 Image 14: Days off
3.4.Suspended events
The great advantage of our application is its capability to easily handle events and information about the presence of workers. The event which was declared redundant at some point of time, will not be deleted from the database because it is necessary to keep track of updates and if necessary, do the additional correction. All of these events are found in this category of suspended events.
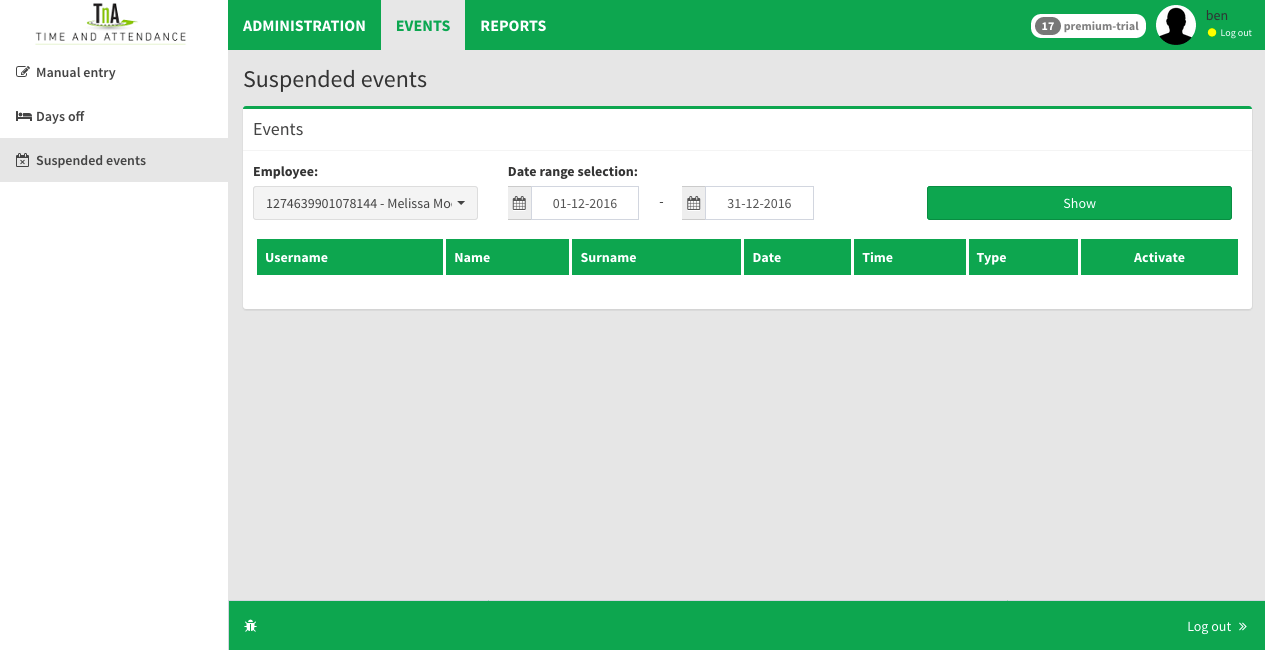 Image 15: Suspended events
4.1.Reports
TnA software allows users to create reports on all entered data and recorded events. Reports are usually presented in the form of chart or table, enabling clear preview of employees engagement.
4.2.Currently present
Real time report that provides an overview of currently present employees. Within this report, workers who are present are marked in green while the absent ones are marked in orange. The user can refresh the current status and verify the information on the present workers at the push of a button “Refresh”. Workers are classified by departments they have been assigned to, so it is easy to examine the current state in every department. The date and time of the last recorded entry or exit is displayed for every worker.
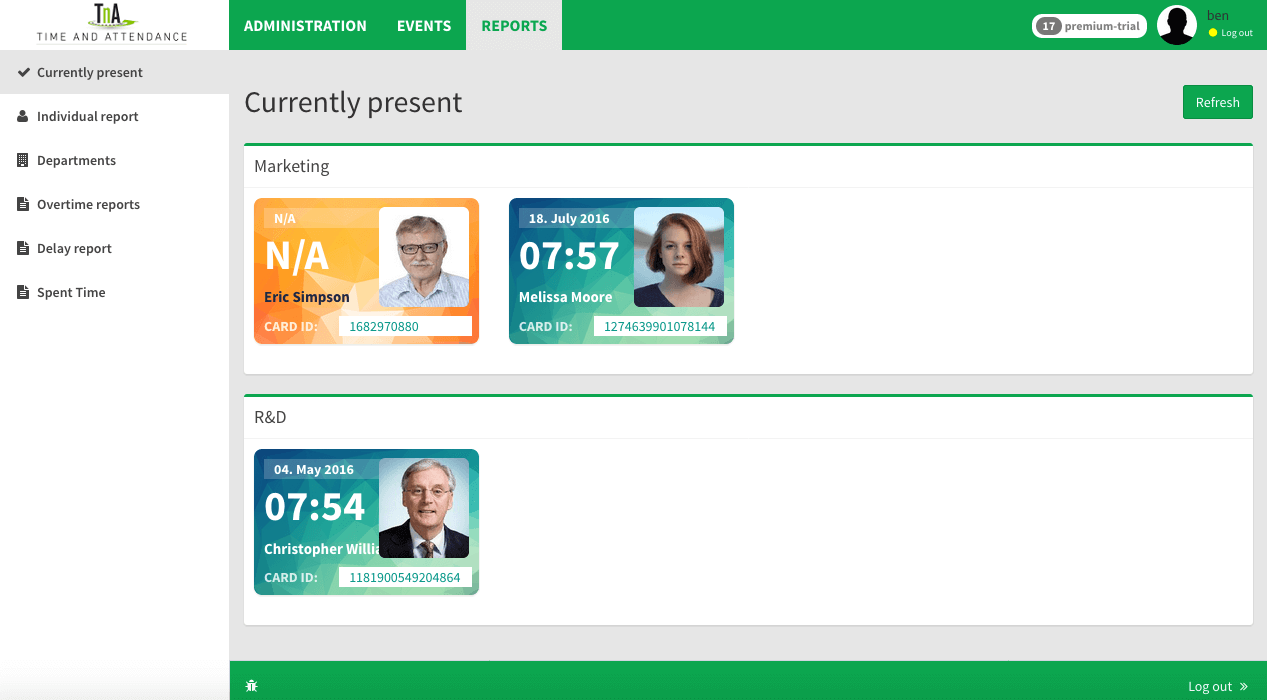 Image 16: Currently present
4.3.1.Individually reports
This option allows the user to create individual reports for selected employee, in a defined period of time (which can not exceed 31 days). Clicking on the button "submit", the user confirms the entered data and software starts generating an individual report.
 Image 17: Reports individually
Graphics chart of the report is created in accordance with the database and as such represents a useful tool for the control of work engagement of employee. As part of this report is a complete analysis of working hours for the selected employee. The top part of the chart is displaying a table with the employee's basic data, photo and all relevant parameters of working time. Observed period of time (month, week or day) can be altered using navigation arrows or by choosing an option from the menu on the right side of the header. The application also has an option of creating PDF document based on graphic reports.
Active component on this page allows you to add new events and to correct detected errors by simply clicking on the graphic. Left mouse click on +Add event opens a new window to adjust the data for the event you want to enter it is also possible to add the shift to a single day or for a period by clicking on +Assign shift.
In case it turns out that some events redundant and should be deleted from the display it can be suspended by left clicking on Suspend an event on the event that is in the table which is activated by selecting Show more details.
Bottom of the report page contains a legend with detailed graphical models of various times and events being displayed.
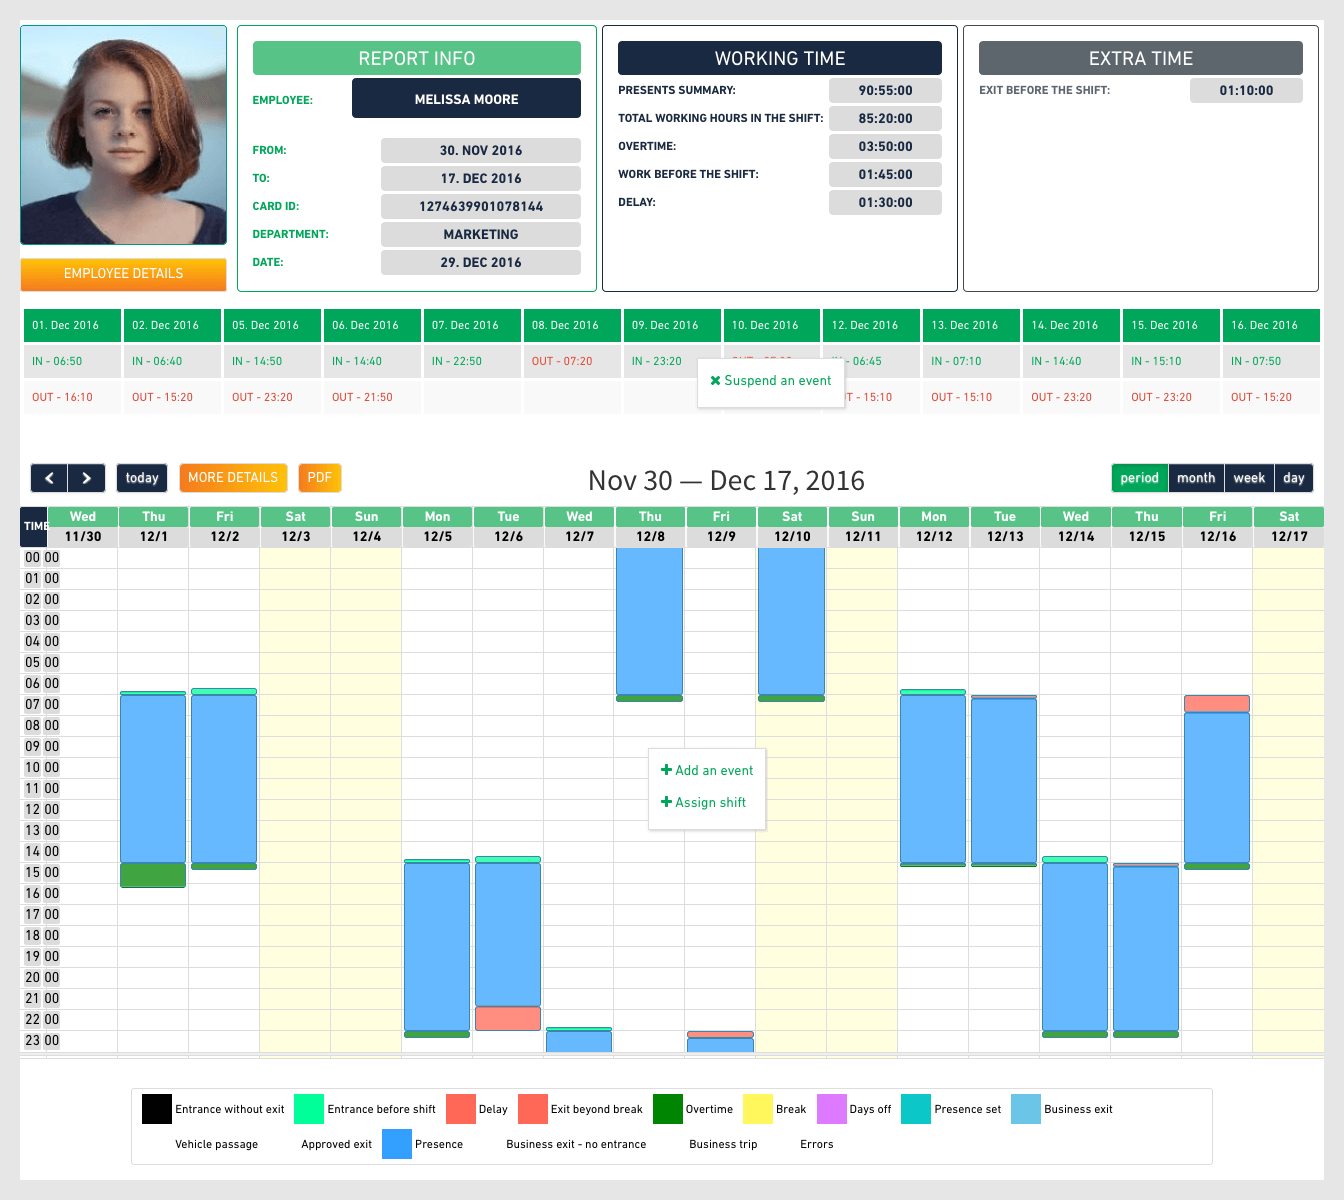 Image 18: Graphic reports individually
4.3.2.Automatic detection of shifts
One of the most complex functions of the software for time attendance is the ability to detect shifts in which the employee was engaged, especially if there is continuity of shifts in schedule or if there is an overtime, before or after the official duration of the shift.
Solutions that most similar softwares are offering are based on the input of special templates with all possible shifts in which an employee is engaged, for each employee individually. This solution is not practical due to possible changes of schedule and duration of the shift, as well as the already mentioned over time that can easily lead to false detection of shifts. This often involves painstaking changes, analysis and correction of reports on the time spent, as with a larger number of workers can be a big problem for the HR department.
Our software for time attendance based on advanced algorithms for analysis and detection of shifts in which the worker was hired without the need for entering all the possible combinations of shifts can be hired. All you need is to detect the arrival time workers on the job and the time of his departure from work and software will detect where the shift worker was engaged, regardless of whether his involvement was pre-planned or had overtime.
This way, workers are protected in the case event that the absence of the pre-defined shift ran as a failure or delay to these workers, although there is a real need.
On the other hand protected and that the employer at any time within the report can see exactly how much the duration of regular and overtime workers, regardless of the predefined schedule and duration of the shift.
4.4.Department
This option enables creating a series of individual reports that were previously described, for the entire department. This is saving a lot of time especially when creating accounting reports at the end of the month.
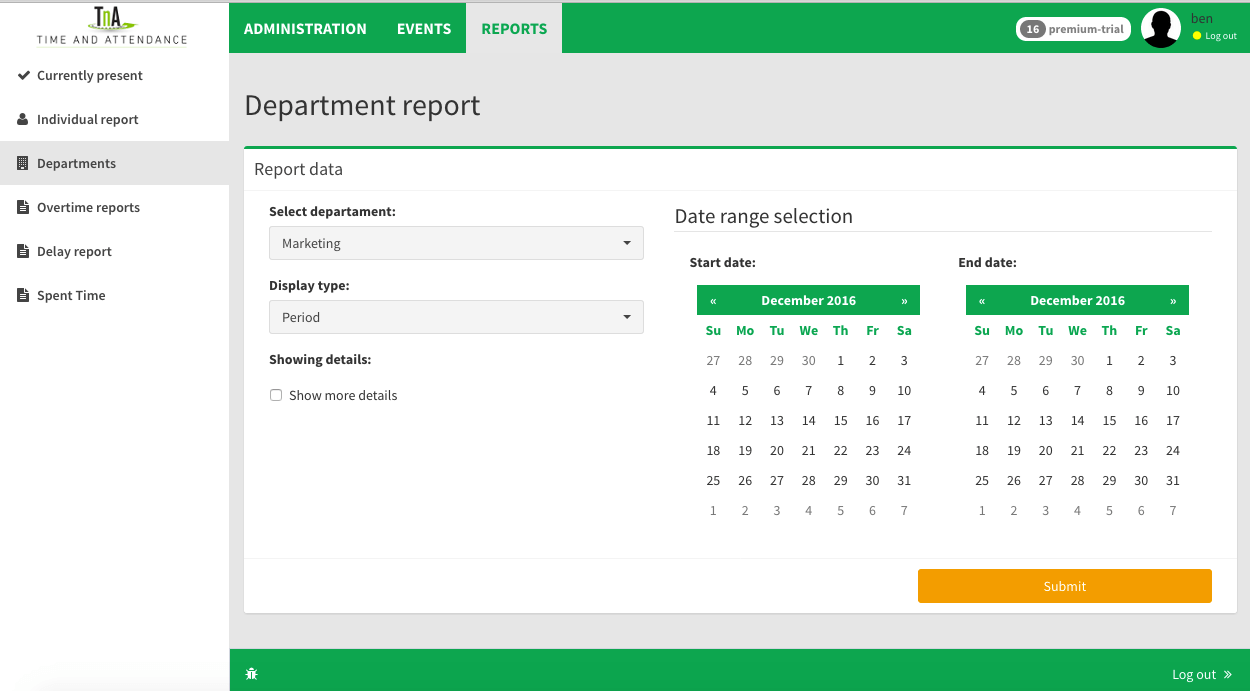 Image 19: Departament reports
4.5.Overtime reports
Basic version of the TNA web application, has a report on employees working overtime , and also a report on the employees presence outside of usual time frame of business hours. On the main screen, user may choose the employee for whom the report is being made and the related time period to which the report relates (start date, end date). It is possible to generate reports for a specific department. Finally, user may choose if he wants the report to display summary values for the selected period of time or separately, day by day and also the orientation of reports.
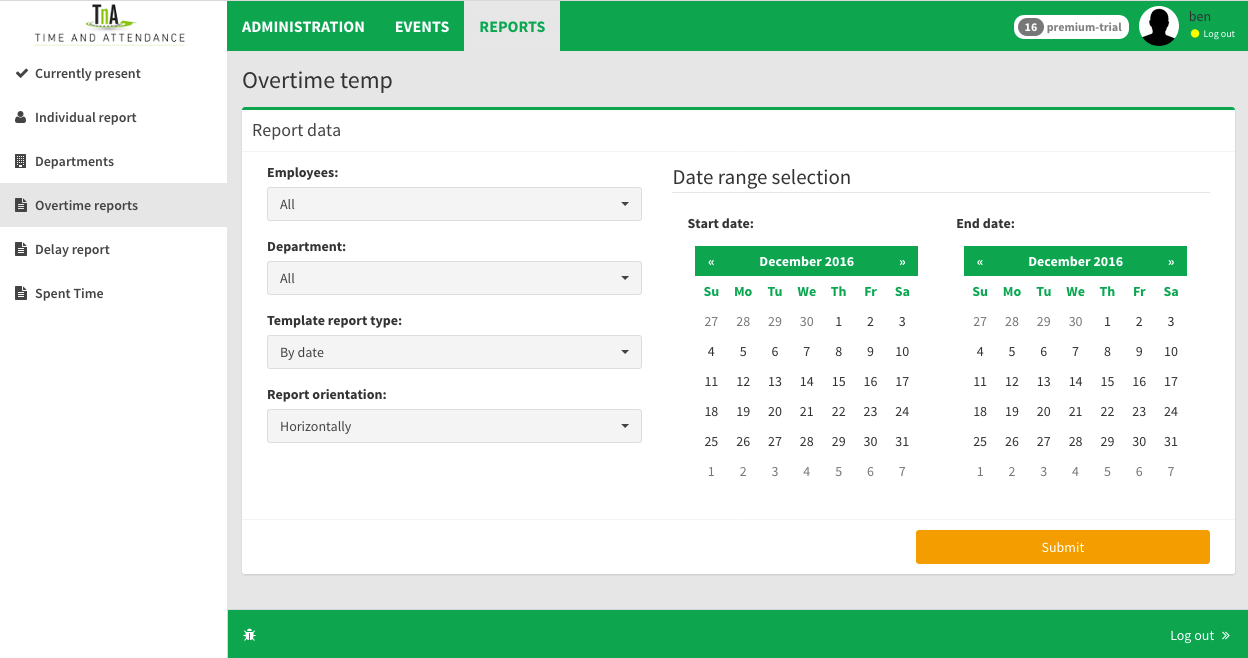 Image 20: Overtime reports
4.6.Delay report
This report is a table display of the individual employee’s delays, for the selected period of time. As with previous reports, it is necessary to choose the employee and the period of time related to report. After entering these data and clicking the “Submit” button, report is created.
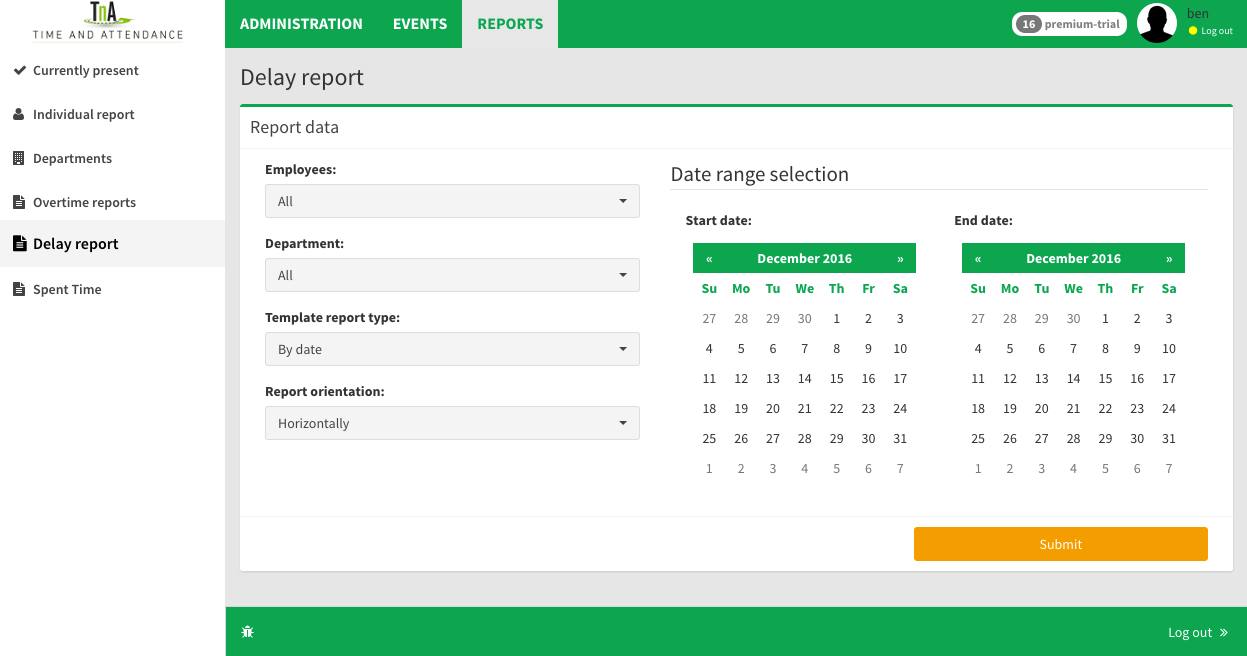 Image 21: Delay report
Created table report is active and provides the ability to view graphical reports for a particular event. A simple click on the value in the table, opens a new window with a complete graphical report for that date.
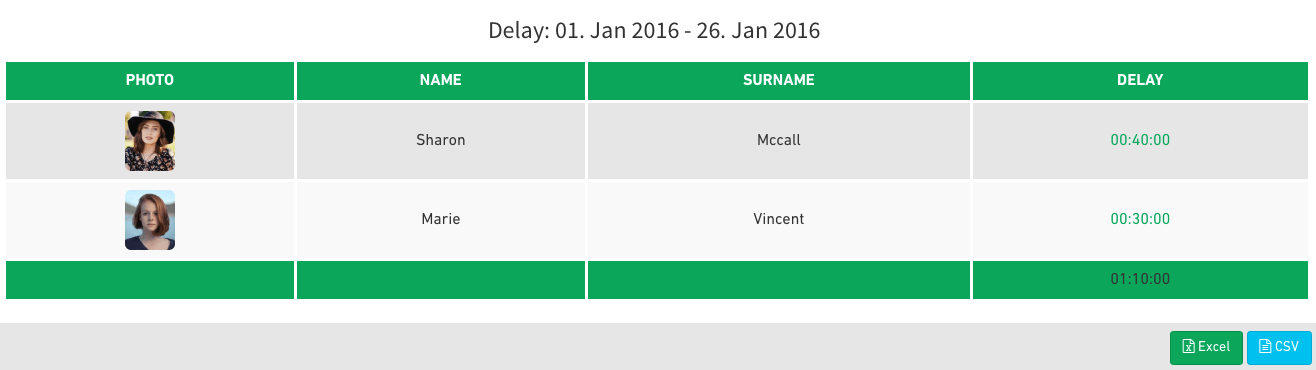 Image 22: Delay report
4.7.Spent time
Spent time is ultimate report that gives a complete overview of events and all parameters of the working hours for each and every employee. By selecting standard set of parameters, user has complete freedom in creating reports, individual or group reports. Like in other application’s reports, every element in a table is an active link to a graphical report of the selected event.
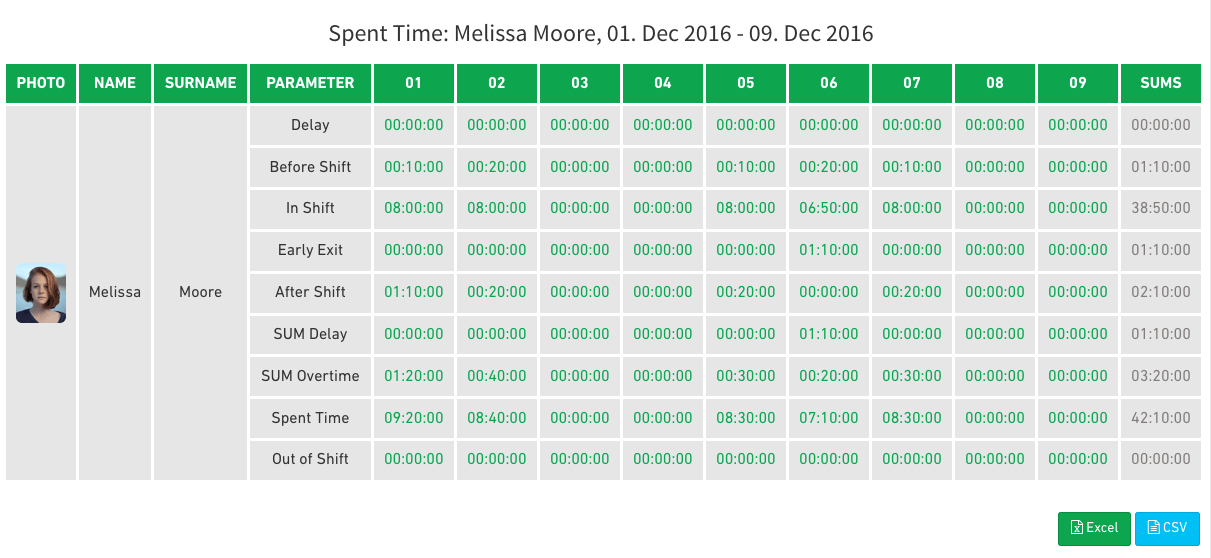 Image 23: Spent time report
5.1.Conclusion
The manual contains description of basic functions of Cloud TNA WEB system, created to help users mastering all the aspects of this application.
Our customer support service is always available, prepared to answer all of your questions and open-minded for your suggestions and comments. We can be contacted directly through our,
website: www.time-n-attendanc
or by mail to: support@time-n-attendance.com